7.12.2010
An Artist's Accessory
Kelley is an artist, so it's important that she is able to carry her journal and art supplies with her at all times, along with all the other standard goodies you would find in most people's purses. We also decided that a messenger style bag would be best because it would allow for more hand/arm freedom than a shoulder bag can offer. This way she can sketch and write and not have to worry about holding her purse. Journal away, Kelley! I hope you love your Meg James Design!
7.09.2010
Some recent purses...
My sewing had to be placed on the back burner a bit while moving and all that goes with it was in progress. I still managed to complete a couple of projects that were in the works, however, so here's a little montage of recent pretties:
7.07.2010
A bit further along...
We decided the light and creamy paint color you saw in so many of the "before" photos was perfect to keep in the kitchen as long as we brought some color and some darker accents into the other two rooms. It was really exciting to start with such a blank slate and know that I could take it in any direction I chose.
I didn't struggle for long with where to take it, though, because this BEAUTIFUL chair fell into my lap and became the inspiration for the whole house (and yard!). It was a housewarming gift from my kind-as-kind-can-be and generous-as-generous-can-be mother-in-law. It resides in the front room and brings a smile to my face every morning when I come around the corner!
While "the whimsy chair" (as Brian dubbed it) offers a splash of much-needed color in the front room, we went for a super neutral fabric for the new couch so it would hopefully last the test of time and accomodate many paint colors over the years. Here it is in the living toom the day it got delivered:
Once the couch was in the house, I felt better about committing to a paint color for this room. I wanted it to have some color but not be overwhelming. I also knew it needed to be dark because every other thing in the entire room was not. There are a ton of evergreen trees in our yard and in our neighborhood, and I drew some inspiration from the pines when picking out the paint. This isn't the greatest picture of it, but here's the room while the paint is drying. Hi Moose!
I also was eager to get a move on the front yard, because as you saw in the "before" photos, there wasn't a lot going on (unless you count dandelions). We figured that if we could find a way to disguise the well head that was strageically placed smack in the middle of the lawn all by itself, then we would help make the lawn a little prettier. Thus began the largest landscaping project I have ever undertaken on my own.
On day 1, I scribed out the border with a shovel and sprayed gas killer on everything within it. A few days later, much of the grass was gone and I began the horrible task of getting rid of all the sod. That was day 2, and it was a loooong day 2. I was out there sweating from 9:00am to 5:30pm clearing that stuff out. Wwwhhheeeew- makes me tired just thinking about it! Anyway, I stared at the cleared out space for a couple days while I decided what to plant there. I already had a couple of nice plants that I knew I would incorporate (some hostas and irises from the South Haven farmers market!), so I placed them in their pots here and there to help get the creative juices flowing. Here's the plot sometime after day 2 but before day 3.7.02.2010
New cool project alert!
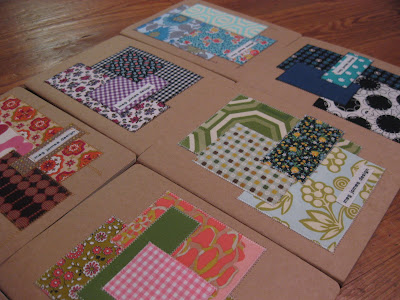
While I was excited to embark upon this Michigan adventure, I was also terribly sad to leave my Schott Design family. We are a close-knit crew, and I wanted to come up with a special way to thank them all for being so fantastic. While perusing a book full of handmade projects from my mom, I found a neato idea that I could put my own twist on and customize for each individual. I bought Moleskine notebooks (I picked the craft paper ones because I liked how they let the fabric be the star of the show), took scraps of modern and vintage fabrics, fused them to interfacing, then sewed them to the notebook covers in various layouts. Each notebook gained its own personality as I went and it was so fun to see them take shape. I then sewed a label onto each one, wrapped them in twine and attached a card addressed to the recipient to the top. You could do this with lots of different notebook colors and sizes...the possibilities are endless! If you'd like more detail on the how-to part, just let me know - it's easy! :)


